SGX

Sunday 27 November 2016

ColourPop Cosmetics Haul and Review

ColourPop Cosmetics was one of those brands I had been wanting to try for a long time! When they advertised that they were doing free international shipping (which is available for the rest of this year!) I couldn't help but treat myself to some of their products.
With there being sooo much to choose from I headed over to YouTube to see what people recommended and soon enough my basket was filled up.. it was all too easy! I ended up picking 4 of the Ultra Matte liquid lipsticks, 1 of the Lippie stix, 3 Super Shock Shadows, a Super Shock Sheen highlighter and an eyebrow pencil (which I forgot to photo..oops)


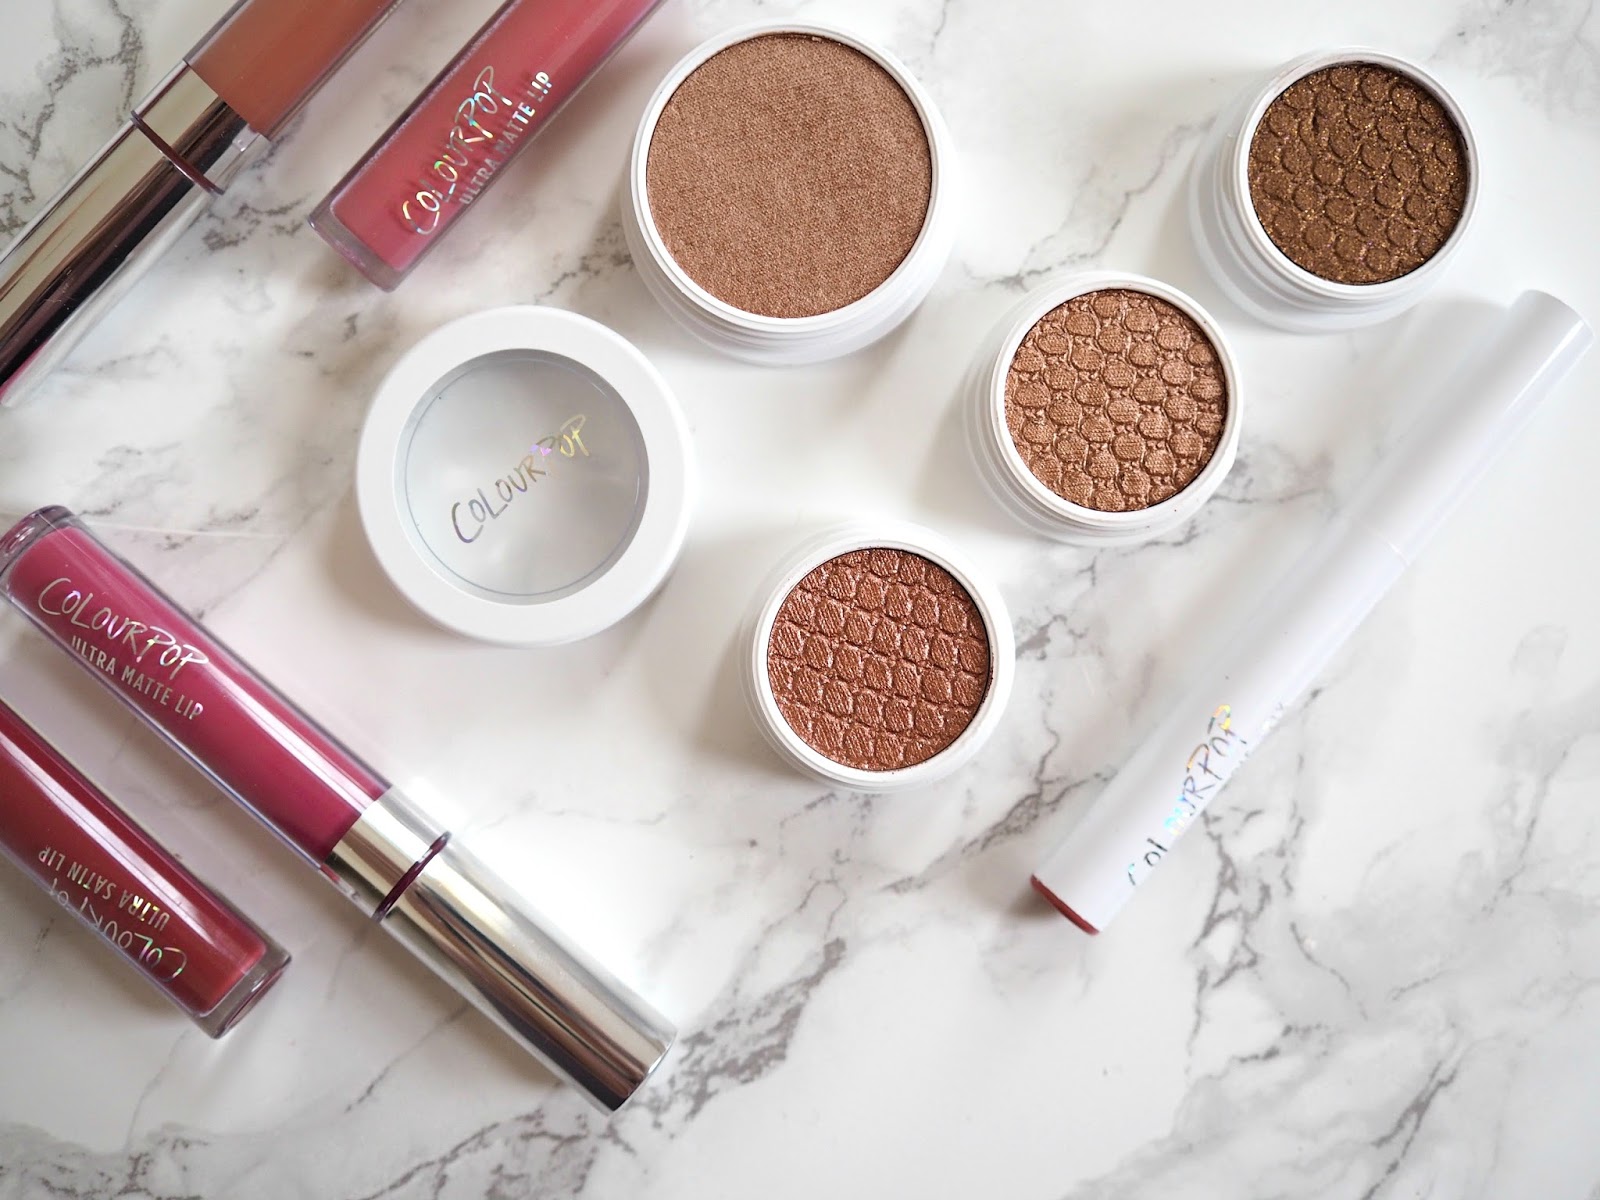
To start with, I love the packaging of the Ultra Matte Lips, it's so simple and I like that you can actually see the product


When I first swatched these I wasn't sure what to expect. Although they're hyped about A LOT across the beauty blogger realm, I was a little sceptic purely because of the price point which is just $6.00 each! But there is a very good reason why people have been shouting from the rooftops about these, because they really are amazing. The colour pay off is perfect, they do not go streaky and they do not budge - trust me, I literally had to scrub my arm with all sorts and it still left a mark!


From top to bottom we have 
3. Viper
Another great thing about the Ultra Matte Lips is that they aren't too drying and they don't crumble or transfer at all. Basically they are an all around great product and I think I need more..

Next is the Lippie Stix pen, you can see in the picture above how amazing colour is, and this product is so creamy and easy to apply. The colour lasts well but it does transfer a little when eating/drinking, but that isn't something that bothers me, especially when the Lippie Stix sell for just $5.00!


Next we have the eyeshadows. Seeing as I don't wear eyeshadow that often (it's definitely something I need to practice!) I went for some safe colours - ones that I figured would make me look less like I'd been punched in the face


Again the colour pay off is incredible with these little beauties, the texture is so creamy and they're really easy to work with as they blend like a dream!


From top to bottom is
1. LaLa
2. Sequin
Again these eyeshadows are just $5.00 each but you can also buy them in sets (and there are some really amazing ones!)

The same can be said for the highlight. I went for something with a gold undertone as I didn't have one like this yet, and I'm definitely glad that I did. This one is called Butterfly Beach, it's quite subtle as it isn't filled with glitter so it's definitely something that you can wear day to day but you can also build it up by adding a powder highlight over the top!


Finally I tried out the eyebrow pencil in the shade Taupe. It's a retractable pencil with a spoolie at the other end which is always a winner! I picked this up for when I'm at work - I love my ABH Dipbrow Pomade but it's a little much for work!

Have you tried any products from ColourPop yet? I think I might need to pick up a few more products, I've got my eyes on the Just Peachy Ultra Matte Lip set!


SHARE:

Saturday 8 October 2016

Review // Dr PawPaw Multipurpose Soothing Balms


Earlier this week I received a little parcel from Dr PawPaw containing three of their Multipurpose Soothing Balms. Having used the original lip balm in the past I was super happy to receive these as this stuff is literally a lip saviour! If you're like me and suffer from chapped lips in the autumn and winter months then I would seriously recommend that you try these!
As a multipurpose balm you can also use it on any dry patches of skin - it is enriched with Vitamins A, B, C and E which work to provide intense hydration and repair damaged skin


As well as the original balmyou can now also get the Peach Pink Tinted Balm as well as the Ultimate Red Tint. I have tried out both of the tinted balms since I received them and they both give you a subtle colour and the formula is still the same as the original balm 


The ingredients in the Dr PawPaw soothing balms are simple and consist of just Carica Papaya, Aloe Vera, Olive oil and Petrolium jelly. They are paraben free and they are not tested on animals! 


What are your favourite products to combat dry skin and lips in the A/W months?

X

SHARE:

Wednesday 28 September 2016

New products Review / L'Oreal Paris Elnett Range


Recently L'Oreal Paris added some new products to their Elnett range including a new Heat Protect Styling Spray and the new Creme de Mousse. The Creme de Mousse product is available in 3 different formulas, and after watching Victoria's (InTheFrow) YouTube video on how to achieve big bouncy curls (you can watch her tutorial here), I just had to get my hands on the Volume and Strong Hold Mousse.
Both the new products come in the classic Elnett Gold packaging which I think looks beautiful especially considering the price of the products!

I have used heat on my hair since I was around 12 years old to try and tame the curls which I hated when I was younger, as lovely and thick as it looks when it is curly, as soon as I straighten it, it turns lifeless and about as flat as a pancake. Most volumizing products I have tried seem to work when they're first applied but then shortly afterwards my hair is back to its flat ways, so I thought I would put the Creme de Mousse to the test!

(Ever start painting your nails and forget to do the second hand?...yep!)

I usually leave my hair until it's almost dry before quickly finishing it with the hair dryer, just because the less heat the better! So before blow drying it I applied the mousse to the roots roughly, I added a bit at a time just to make sure I didn't go overboard! 
Then I whacked my head upside down and blow dried for a few minutes.

The product felt really lightweight and it smells lovely


I know I don't have a picture of what my hair would usually be like at this point but trust me, it felt and looked a lot thicker than my normal post blow dried hair! 
Another really good thing I noticed is that my hair still felt clean! I didn't feel full of product or sticky at all so I was really impressed

Then I picked up the Heat Protect Styling Spray, again there are a few different formulas but I picked up the one that claims to be Ideal for Straighteners which apparently protects up to 230 degrees C! I sprayed this just through the ends of my hair and brushed it through before applying heat


Again this spray smelt really nice and didn't leave my hair feeling full of product


Here is the finished look, it might not look overly voluminous to some, but my hair feels and looks so much thicker than it normally does and it actually lasts which is more than I can say for most volumizing products that I have tried in the past! For a product that only costs £5.99 you really can't go wrong and I would definitely recommend it!

Have you tried any of these new products? What are your favourite products for adding extra volume to your hair?

Shop
SHARE:

Tuesday 20 September 2016

The LBBD // Little Black Beach Dress


 (Sorry for the poor Instagram edit quality!)

So I know summer is over but I though I would share with you my favourite LBBD. This little beauty is from Boohoo, and it's been a go-to beach dress for me this year. 
One of the beautiful things about living in Jersey is that you are never far from a beach and that means, you can never own too many beach dresses/cover ups!

(I promise I'm not giving you evils, I was facing the sun and I could barely keep my eyes open!)


Shop
Boohoo dress here
Topshop Denim Jacket here
Abbott Lyon Tan Suede Watch here

X


SHARE:

Thursday 15 September 2016

Autumn Lookbook #1

So we all know that Autumn/Winter is fast approaching, and if you're anything like me this isn't a time that I find exciting whatsoever - I'm a summer girl. When I see people getting excited about wearing jumpers and getting under a blanket to watch a film with a hot chocolate I just don't get it - I'd much rather be watching a film in a big baggy tee with a pint of ice-cream, or better yet down the beach waiting for the sunset.

That being said, I love any excuse to add new seasonal pieces to my wardrobe so I decided to put together 3 different outfits for Autumn to share with you - day time/ casual, dinner date and a night out!
There's a mixture of high street and designer items (not that I can afford a designer label but I got carried away on Polyvore.. if only money grew on trees) but I will include cheaper alternatives in the shop links at the bottom of each outfit!

1. Day Time/ Casual
Balenciaga Race Runners have been at the top of my wishlist for quite a while now, and that is where they will probably stay thanks to the somewhat hefty price tag! They're a sports luxe dream though right?!

Shop
1. Topshop Bomber Jacket here
2. Newlook Jumpsuit here (Only £18)
3. Michael Kors Bag here
4. Balenciaga Race Runners here. Similar here

2. Dinner Date

I think this is my favourite outfit of them all! At least I have the shoes - I'm obsessed with the perspex Yeezy vibes these heels have

Shop
1. Miss Selfridge Leather jacket here (Only £49!)
3. Topshop Jeans here
4. Romwe Bucket Bag here (Only £12 in the sale!)
5. Ego Official Perspex Heels here


3. Night Out

Slip dresses are everywhere at the minute and they look amazing paired with a pair of thigh high boots. The Chloe 'Faye' bag ... need I even say anything? It's just perfect

Shop
1. Chloe Faye Wallet bag here, Similar/dupe from YesStyle here (Only £20!)
2. Areyouami Slip dress here. Similar from InTheStyle here
3. Nelly.com Thigh high boots here

Which outfit is your favourite? 

X


SHARE:

Friday 9 September 2016

My Favourite Nudes // NYX & MAC Swatches and Review


It dawned on me the other day that I very rarely pick anything but nudes when it comes to choosing my lip colour - and there are still so many more nudes on my wishlist! I love every shade of nude whether its a cooler pink tone to warm brown tones, there is something for every occasion.
I think I always opt for a nude colour as it makes me feel put together but not OTT, I just don't have the confidence to try and pull off a lovely bright or dark colour on a daily basis.

Below I have swatched some of my favourite nudes from NYX and MAC


From top to bottom: NYX Soft Matte Lip Creams in Abu Dhabi and Cannes followed by MAC's Honey Love, Yash, Faux and Spirit

The moment I first tried out the NYX Soft Matte Lip Creams I literally fell in love. The formula is creamy, the shades I have tried apply without streaking and they don't dry out your lips like a lot of liquid to matte formula's can do. The longevity isn't too bad either, you do need to top up after eating and drinking but for a product of it's price line I think this isn't bad at all. Boots in Jersey recently installed a NYX counter so my collection of these will definitely be growing! 

As for MAC they really do have an amazing collection of nudes - to the point where it's actually quite difficult to pick which one to for when you're at the counter! I love these matte lipsticks, again they are quite creamy but I do find the formula is slightly different depending on what colour you go for, so some do dry out a little after a while. Again they need to be topped up after food or drink but this isn't something that really bothers me at all, I actually quite enjoy nipping to the bathroom and topping up my lipstick!

Another thing I love about nudes is that you can completely transform the colour by putting a different lip liner with them


The two NYX Lip Liners above are in Nude and Natural, they are retractable liners which I love because I'm forever loosing my sharpener, plus if you take it out in your handbag you don't need to worry about the pencil snapping leaving you with a blunt liner! Out of these two lip liners the 'Nude' shade has a pink undertone and the 'Natural' shade has a more brown undertone. The formula is creamy so they are really easy to apply - they actually feel more like a lipstick formula than your typical pencil formula and the colour pay off is really good

Below are my three go to MAC Lip Pencils in Oak, Spice and Boldly Bare, I find you can really pair these up with any of the MAC nude lipsticks and create a different look every time. 
Oak has a lovely cool brown tone and can be built up whereas Spice is a deep warm brown and is really pigmented so again you can adjust how you want it to look. Finally I have Boldly Bare, probably my favourite Lip Pencil of all time, I love the shade of this and actually wear it by itself a lot of the time! Boldly Bare has more of a pink undertone and it's so versatile, if I could recommend only one, it would be this one! (Swatches below!)


Top to bottom: NYX Lip Liner's in Nude and Natural followed by MAC Lip Pencil's in Oak, Spice and Boldly Bare

*Unfortunately the swatch of the NYX Natural Lip Liner won't show up true to colour - it looks quite ashy here but in reality it isn't!*


Another favourite nude combo of mine is MAC's Velvet teddy with the Whirl Lip Pencil but I didn't have them with me to photo at the time!

Next on my To Buy list is a selection of the Jouer Liquid Lipsticks, they have an amazing nude collection that I've been wanting to get my hands on! Has anyone tried these yet?

What are your favourite nude lip colour and combos?


(Wearing MAC Boldly Bare Lip Liner all over the lip here!)

Shop the products

NYX Soft Matte Lip Cream in Abu Dhabi here
NYX Soft Matte Lip Cream in Cannes here

MAC Honey Love here
MAC Yash here
MAC Faux here
MAC Spirit - currently out of stock online

NYX Lip Pencil in Nude here
NYX Lip Pencil in Natural here
MAC Lip Pencil in Oak here
MAC Lip Pencil in Spice here
MAC Lip Pencil in Boldly Bare here

SHARE:

Saturday 3 September 2016

August Favourites

I was washing my hair the other day thinking about how much I love the shampoo and conditioner I've been using when I suddenly thought... People NEED to know about these products, that's when I figured I would write a post about my favourite things from August.

Seeing as the hair products gave me the idea it's only fair that I start with them so here we go!

1. Garnier's Ultimate Blends in 'Honey Tressure'. 
I've been using both the shampoo and conditioner for a few months and I've re-purchased it every time, it just leaves your hair feeling so soft and super shiny!
 In August I went to Croatia for 2 weeks so my hair and I spent a lot of time in the sun and in the sea, by the end of each day my hair would feel like straw and after spending hours in a messy bun it would also be full of knots, to the point where I would dread trying to get a brush through it. As much as my hair seemed to hate me for all of this, the Garnier Ultimate Blends shampoo and conditioner literally worked miracles. The products are aimed at dry and damaged hair and claims to strengthen, nourish and protect and I can definitely say it didn't let me down!


The Strength Restorer Balm is a lovely thick conditioner which can also be used as a mask, when we arrived home after our holiday I left this in my hair over night and my hair had honestly never felt so soft and smooth the next day!


As a girl with fairly curly and frizzy hair who straightens it all through the week I have come to rely on these products to make my hair feel healthy again! 


You can shop these products at the bottom of the post :)

2. MAC Cosmetics lipstick in 'Yash'


Yash by MAC has quickly become my go to lipstick since picking it up at the end of July. It's a matte nude with a brown undertone and I am literally obsessed with the shade. Although it's a matte shade it is still quite creamy when you apply it so it doesn't dry out your lips or become cracked.. what more can you ask for?! 


If you like MAC's 'Honey Love' then you should definitely give this a try, they are fairly similar though Honey Love has more of a pink undertone! 

3. Yves Saint Laurent Rouge Volupte Shine # 8


I picked this beauty up in Duty Free at Gatwick Airport whilst waiting for our flight to Croatia, I'd been eyeing them up for a while so I decided to take the plunge and I'm so glad I did! I wanted something with a pinky/purple shade that I could wear in the day time to keep my lips hydrated but also give me some colour and this shade did exactly that.


Not only is the packaging and the shade gorgeous but it's hydrating and...SMELLS LIKE WATERMELON!!! **Heart eyes everywhere** Ah guys, it's seriously amazing! The Rouge Volupte Shine range is all beautiful and now I definitely want to get my hands on some more, they are a more pricey product but it's also a great quality product.

4. NYX 'Sculpt & Highlight Face Duo'


I love NYX, I haven't found a product from them yet that I don't like and for the price of their products you literally can't go wrong! I grabbed this Sculpt and Highlight wand at the end of July and I have been loving it, it's formula is really creamy so it blends like a dream!


I was pretty terrified when I first saw the colour of the contour shade but after you blend it over your foundation it leaves you with the perfect contour or you can use it as a bronzer if you want a warmer tone to your face. It comes in a variety of shades as well so I'd recommend giving this a try seeing as it cost only £9.00!

5. New Look White Back Pack


There's not an awful lot to say about this bag but I just can't put it down, it has been coming everywhere with me and even though it's small I seem to be able to get so much inside it! How had I never realised how convenient back packs where? It's a total game changer! I picked up this one from New Look for just £17.99!

6. Aldo Choker


I mean... do I even need to say anything? This choker is just perfection and I want to wear it forever! Aldo have some gorgeous chokers and I have a few more waiting in my saved items list, if only I could figure out which one to buy next! ..This is one reason I hate being a student, otherwise I would buy every. single. one! 


Shop:

Garnier Ultimate Blends Shampoo and Conditioner here and here

MAC 'Yash' here

YSL Rouge Volupte #8 here

NYX Sculpt and Highlight here

New Look Back Pack here

Aldo Choker here

SHARE:

Sunday 21 August 2016

OOTD // Croatia

Holiday's are the perfect time to throw on a white dress and show off your tan, one evening we went for a walk around the harbour to find a nice little seafood tavern where we could stop for dinner (and wine).

After recently ruining one of my favourite dresses I was lucky enough to replace it before I left for Croatia with this little white dress from AX Paris! I teamed it with my New Look backpack and a pair of flip-flops to give it a more relaxed/casual vibe, grabbed my sunnies and we were ready to go!


Shop:

Dress here
Backpack here
Watch Michael Kors
Sunglasses Michael Kors

SHARE:

Tuesday 2 August 2016

DIY Gel Nails Tutorial // Rose Gold Glitter


 I was browsing the internet at some crazy hour in the night when I found myself clicking on this little UV lamp for gel nails.. being so small and from a shop on eBay it only cost around £8.00. Now I love going and getting my nails done and having a bit of a pamper, but unfortunately there is no such thing as a reasonably priced nail bar in Jersey (prices of gels range from £25 - £40+.. god help you and your bank balance if you want gel extensions or acrylics!) With this in mind, I thought why not give it a try. at least if it didn't work I wasn't going to be loosing a lot of money.. so into my basket it went. I figured before I paid I'd better check out the price of the gel polish, I was pleasantly surprised and ordered both the base and top coat for around £3.00 each. Then it came to choosing which colour I wanted, and we all know that this can be a long process, especially when you're faced with 70+ colours.. in the end I decided I would buy a gel colour from Boots, that way I could see what the colour was actually like in person (even though it cost a little more). I picked up the Rose Gold Glitter polish from Sensationail as well as their Gel Polish Remover and the Remover Tool.

Now I knew I wasn't going to get that 'salon quality finish' especially after paying for a cheap UV lamp, base and top coat, but I was looking forward to the experiment and it is safe to say I am pretty pleased with the outcome! 
If you would like to know how they turned out or how you can achieve this at home then please keep reading :)

 Step 1: First of all I had to remove the gels that were already on my nails (please don't judge..I had been drunken picking at them the night before)
Simply get yourself 10 pieces of cotton wool and 10 pieces of tinfoil 
Soak each piece of cotton wool and pop it over the nail, then grab a piece of tinfoil and wrap it around the top - this makes sure that the gel remover stays in place as you have to leave it for around 10 minutes, and the heat also helps with the removal!

Oh.. and if you are doing it yourself then it's best to do one hand at a time!

 TIP! Definitely make sure you do this over an old magazine or newspaper.. it can get a bit messy

 Step 2: After 10 minutes remove the first cotton pad to see if the gel is ready to come off.
Using a remover tool like this one is better for your nails so it is definitely worth the purchase! (I can say this from experience after trying to remove gels a while back and butchering my nails after using a wooden stick. It was quite tragic)
Place it at the bottom of the nail with a little pressure and the gel polish should come off nice and easily 


  It is probably a good idea to put something on those poor dry, sad nails here.. but I didn't have anything. Nail technicians would be horrified by this I'm sure buuuut never mind
Step 3:  Apply a thin layer of the base coat to the nails and whack them under the UV lamp


I had to do this a fair few times (I half expected this from buying such a cheap lamp, luckily for me I had no plans for the rest of the evening so time didn't matter too much!) and even then they didn't feel quite dry and had a sticky feeling to them..I gave up trying to get them any drier and moved on!

 Step 4: Apply a thin layer of the colour and again, put them under the UV lamp


  As before with the base coat, I had put these under the lamp a number of times and I won't lie, it was getting a bit boring. After the first coat of colour I started to think that maybe I had picked the wrong one, but I powered on

 Step 5: Apply another layer of colour.. so basically repeat step 4! 

 After the second coat had been applied I realised that I HAD picked the right colour, this is exactly the colour I was after! 
*Huge sigh of relief*

Step 6: Finally, apply the top coat and again dry under the UV lamp


I think it's safe to say the UV lamp isn't great, I wouldn't recommend this particular one..unless you're on a budget and don't mind waiting what feels like forever for them to dry! Also it got really hot after a while, so whatever you do, do not leave it plugged in even if the light is not on!
The base coat, top coat and gel polish I was really happy with and I will definitely be buying some more colours from Sensationail. I was also really happy with the Sensationail Gel Polish Remover, as well as the acetate it contains some oils and vitamins and it had a much less offensive smell than acetate by itself! The remover tool was also great and I didn't feel as though I was completely ruining my nails which is always a good thing

So far I am really pleased with the finished look..now to see how well they last! I will do an update over on IG (@SGX____) to let you know if they stand the test of time


Shop:

Gel Polish Remover here
Removal Tool here
Base coat here
Top coat here
Gel colour here
UV lamp here

SHARE:
Blogger Template Created by pipdig